


A burst pipe rarely announces itself. The water line freezes overnight during a cold snap, the ice expands, and the actual leak often shows up a day later when the pipe thaws and water starts pouring into a ceiling, a finished basement or the back of a kitchen cabinet. By then the repair bill includes drywall, flooring and sometimes the contents of a whole room.
The good news is that most frozen pipes are preventable, and the fixes are cheap compared with the damage. If you want to prevent frozen pipes this winter, it comes down to three things: knowing where your vulnerable lines are, keeping cold air away from them, and having a plan for the nights when the temperature drops well below normal or the heat goes off.
Why Pipes Freeze (and Why They Burst Where They Do)
Water expands by roughly nine percent when it turns to ice. That alone puts strain on a pipe, but the real damage usually comes from pressure. When an ice plug forms in one section, the water trapped between that plug and a closed tap has nowhere to go. Pressure builds until the weakest point gives way, which is often a fitting or a spot some distance from the ice itself. That is why a pipe can freeze in an exterior wall and split under the bathroom sink.
Pipes most at risk in a typical Canadian house include:
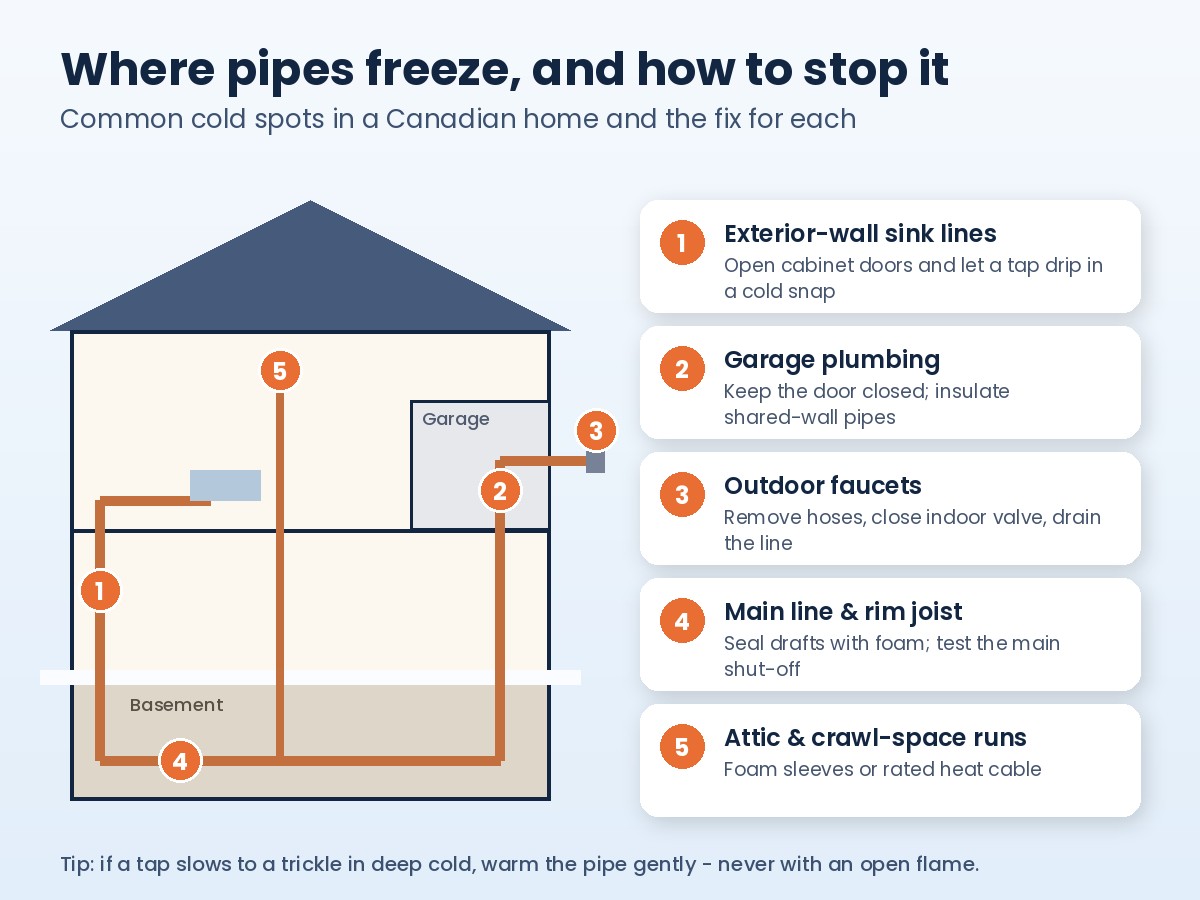
- Supply lines running through exterior walls, especially under kitchen and bathroom sinks on north-facing walls
- Pipes in unheated or poorly heated spaces: crawl spaces, attached garages, attics and the corners of older basements
- The main water line where it enters the house, particularly if the rim joist above it is drafty
- Outdoor hose bibs (exterior faucets) and the short length of pipe feeding them
- Lines near dryer vents, cable entries or other openings where cold air leaks in
Plastic PEX tubing tolerates freezing better than copper, but it is not immune, and the brass or plastic fittings that join it can still crack. Don’t assume newer plumbing means you can skip the precautions.
Before the Deep Cold: A Weekend of Prep Work
Most of the work to prevent frozen pipes happens in late fall, before the first serious cold snap. If you worked through our fall home maintenance checklist for Canadian homeowners, you’ve already covered some of it. Here is the plumbing-specific list.
1. Find and test your main shut-off valve
Locate the main water shut-off, usually near the water meter in the basement or utility room, and make sure everyone in the house knows where it is. Turn it off and on once to confirm it actually works. Old gate valves sometimes seize after years of sitting open, and the middle of a flood is a bad time to discover that. If yours won’t budge, have a plumber replace it with a quarter-turn ball valve; it’s a small job.
2. Shut off and drain outdoor faucets
Disconnect every garden hose. A hose left attached traps water in the faucet and can freeze it solid even on a frost-free style bib. If your outdoor taps have a separate indoor shut-off, close it, then open the outside tap to let the line drain. Leave the outside tap open for the winter so any remaining water has room to expand.
3. Insulate exposed pipes
Foam pipe sleeves from any hardware store slide over the pipe and cost a few dollars per length. Focus on pipes in crawl spaces, garages, unfinished basement walls and any line within a metre or so of an exterior wall. Tape the seams and miter the corners so there are no gaps. For pipes that have frozen before, or ones in spaces you can’t heat, consider thermostatically controlled heat cable rated for pipes, installed exactly as the manufacturer’s directions say.
4. Seal the drafts that reach your pipes
Insulation slows heat loss, but a steady stream of outside air will beat it. Walk the basement on a cold, windy day and feel along the rim joist, around the main water entry, at dryer and bathroom vents and wherever cables come through the wall. Seal small gaps with caulk and larger ones with expanding spray foam. This also makes the house more comfortable and trims your heating bill, which is a nice side benefit.
5. Check the crawl space and garage
Close crawl-space vents for the winter if your home’s design allows it, and keep the garage door shut as much as possible when plumbing runs along a shared wall. If the laundry or a utility sink is in the garage, a small amount of extra insulation there pays for itself quickly.
During a Cold Snap: What to Do When the Forecast Turns Brutal
Ordinary winter weather rarely freezes well-protected pipes. The trouble comes when temperatures fall to minus 20 or lower, a strong wind picks up, or both happen overnight. When you see that kind of forecast, take a few extra steps.
- Keep the thermostat steady. A deep overnight setback saves a little energy but lets walls cool off. During extreme cold, keep the same temperature day and night.
- Open cabinet doors under sinks on exterior walls so warm room air can reach the pipes. Move cleaning products out of reach of kids and pets while the doors are open.
- Let a vulnerable tap drip. A thin, steady trickle from the faucet furthest from the main line keeps water moving and relieves pressure if ice does start to form. Run both hot and cold if the tap has two lines.
- Leave interior doors open so heat can circulate into back bedrooms, bathrooms and laundry rooms that tend to run cool.
- Keep the garage closed and avoid propping the door open while you shovel.
Public Safety Canada’s guidance on preparing for extreme cold also recommends letting water trickle when you can’t keep pipes above freezing, and it’s worth reading for the broader household safety advice around outages and space heaters.
Leaving Home for the Winter (or Even a Long Weekend)
Snowbirds and holiday travellers face a particular risk: a furnace that fails on day two of a two-week trip. A few precautions make a big difference.
- Leave the heat on. Most people set it somewhere around 15 to 17°C for an empty house; check what your insurer expects.
- Arrange for a neighbour, friend or property checker to visit regularly and actually walk through the house, including the basement.
- Consider a smart thermostat or an inexpensive temperature and leak sensor that sends an alert to your phone.
- For long absences, shut off the main valve and open the taps to drain the lines. Some owners also have the system blown out professionally.
Read your home insurance policy before you go. The Insurance Bureau of Canada explains that standard policies generally cover damage from burst pipes in the heated part of the home when reasonable steps are taken to maintain heat, but that vacancy and inspection requirements can limit coverage. Many policies spell out how often someone must check the property while you’re away, so it’s better to know the rule than to guess.
Signs a Pipe Has Already Frozen
Catching a frozen pipe early, before it splits, is the best outcome you can hope for once ice has formed. Watch for:
- A tap that gives only a trickle, or nothing at all, when others in the house work normally
- Frost on an exposed section of pipe
- A toilet that won’t refill
- Strange gurgling or banging when you open a faucet
- Damp patches or bulging paint on a wall or ceiling near plumbing
How to Thaw a Frozen Pipe Safely
If you suspect a frozen line and don’t see any leaking yet, act quickly but carefully.
- Open the affected faucet. As ice melts, flowing water helps clear the rest of it and relieves pressure.
- Apply gentle heat, starting near the tap and working back toward the frozen section. A hair dryer, a heating pad, or towels soaked in hot water all work. Warming the room with a space heater also helps, as long as you keep it clear of anything that can burn.
- Never use an open flame. Propane torches, barbecue lighters and similar tools can start a fire inside a wall or damage the pipe.
- Keep heating until full water pressure returns, then check other taps. If one pipe froze, others nearby may have too.
- Call a licensed plumber if you can’t find or reach the frozen section, or if the pipe is inside a finished wall.
If a pipe has already burst, shut off the main valve immediately, turn off electricity to any wet area if it’s safe to reach the panel, and start moving belongings out of the water’s path. Take photos before you clean up, then contact your insurer and a plumber. Water that soaks into the basement can lead to mould within a couple of days, so dry the space quickly. Repeat problems with dampness down there may point to a bigger issue; our guide to signs your basement needs waterproofing covers what to look for.
Longer-Term Fixes Worth Considering
If the same pipe freezes year after year, the quick fixes are treating a symptom. A few permanent upgrades are worth pricing out:
- Rerouting supply lines away from exterior walls and into heated interior space, often done during a kitchen or bathroom renovation.
- Frost-free hose bibs, which close the valve well inside the heated wall, paired with a dedicated indoor shut-off.
- Better insulation and air sealing at the rim joist, a common weak spot in older Canadian homes.
- Automatic water shut-off systems that detect a leak and close the main valve on their own. Some insurers offer a discount for them.
A Quick Pre-Winter Recap
You don’t need to turn your house into a laboratory. Test the main shut-off, drain the outdoor taps, wrap the pipes you can reach, seal obvious drafts, and keep a short cold-snap routine in your head: steady thermostat, open cabinets, a dripping tap. Add a plan for when you’re away. That handful of habits will prevent frozen pipes in the vast majority of homes, and it takes far less time than drying out a flooded basement in January.